The standard input / output system is a special firmware environment through which the user can adjust the operation of a personal computer. Sometimes it may happen that you forget the password for accessing the BIOS, and now you can’t get to the system settings. But in fact, this problem has a solution, in this article we will consider in detail how to reset the BIOS password on a laptop.

How to remove BIOS password on a laptop
It is not so difficult to reset BIOS settings, and especially for advanced users. Resetting is recommended only if you have not found another solution.
We also recommend using methods that are approved by the manufacturer of your laptop model. The fact is that manufacturers can arrange and connect components in different ways, which is why reset options will not work for all computers.

BIOS password reset on a laptop - three ways
Attention! All methods provided should be used only at your own peril and risk, as they are not suitable for all models. Before using any method, we advise you to clarify the information on resetting the BIOS from the manufacturer.
Reset BIOS menu
- When you start the laptop, additional information is displayed in the right or left corner, you need to pay special attention to this. The fact is that there often is indicated information about which key you need to press to enter the BIOS.
- Many manufacturers set the entry function key delete or F2. At startup, you must press this key several times.
- When you go to the settings, you need to go further to the EXIT section. Regardless of the interface, this section is present in all versions of the program.
- After this, you need to find the item Factory Default, Load Optimized Defaults, depending on the manufacturer, this line may be called differently. Select this item, and then confirm it by selecting yes and pressing enter.

Next, the laptop will reboot and bios settings will be reset to factory settings.
Important! When you enter the BIOS, do not press the button too often. The fact is that the system can calculate that a sticky key has occurred; the built-in speaker can clean up this.
Use battery
Attention! If you are unfamiliar with a laptop device, then it is best to provide a disassembly job to a qualified professional.
 Remove the screws that secure the back cover, then unscrew it, usually it is additionally fastened to the latches.
- Remove the hard drive, cd drive and other items that will allow you to get to the motherboard.
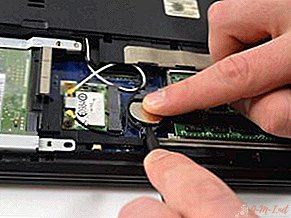
- We need to get to CMOS - the energy element, it can be located in different ways. When you get to this element, you need to remove the protective cap and pull out the battery.
- Then press the power button of the laptop for 15 seconds, after that you can install the item back and assemble. Now you were able to reset the BIOS settings yourself.
 Remove the screws that secure the back cover, then unscrew it, usually it is additionally fastened to the latches.
Some manufacturers took care of users and placed the CMOS element in an easily accessible place, in such laptops there is a special compartment. That is why it is not necessary to disassemble the device, but simply open the compartment and remove the element.
With jumper
As a rule, not far from the CMOS battery is a special 3-pin connector, which is also called CLRTC. Before starting work, you need to make sure that the battery and power are disconnected. Next, follow the instructions:
- The jumper is in the first position according to the standard and closes the 1st and 2nd contacts. Put on gloves and carefully remove the jumper by pulling it up.
- Set the jumper to the second position, thus, contacts 2 and 3 will close. In this position, leave the jumper for 30 seconds.
- Then set the jumper back to 1 position and you can assemble the device, now the BIOS settings are reset.

Important! If the laptop is under warranty, then you cannot disassemble it yourself; for this, you should take it to a service center.
We hope that our article was informative and interesting, now you know how to reset BIOS settings. Good luck!
Leave Your Comment