 When buying new speakers, I want them to stand apart, rather than crowding on a computer desk, on which there is so little space. Often, the new acoustics are much more old, because of this there is a problem of placement. The way out of this situation - racks for speakers. Thanks to them, the speakers will stand apart from other gadgets, respectively, the sound will be cleaner and better.
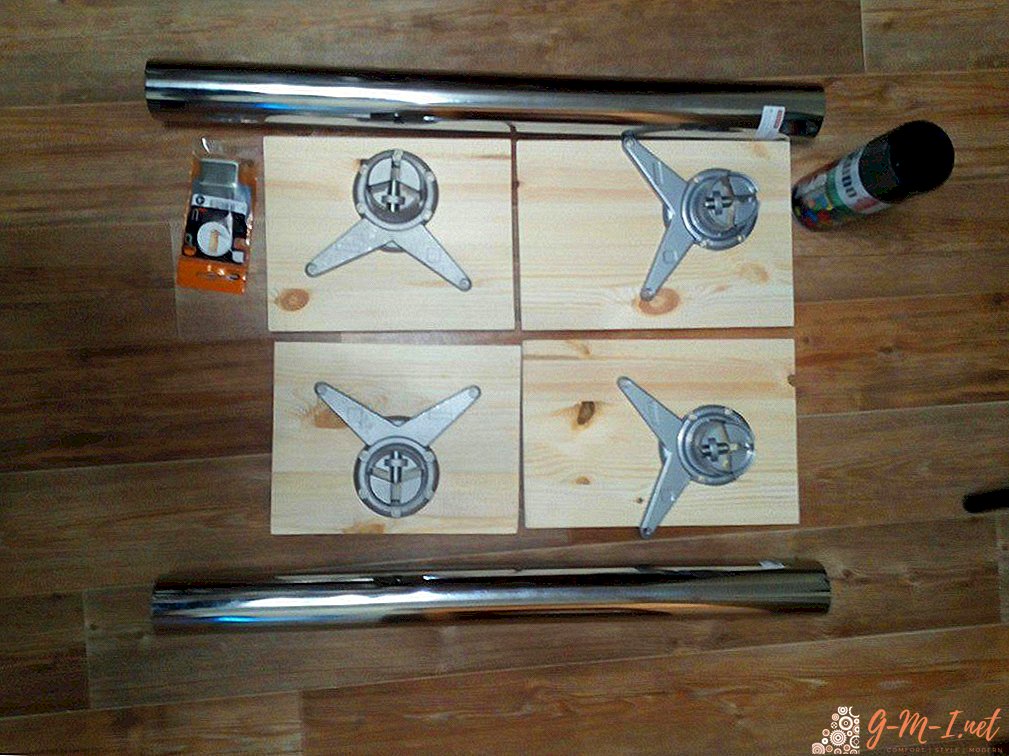
Materials and tools
The material for the racks are as follows:
- Stainless steel pipe. Diameter 50-70 mm, as you like. Will play the role of legs.
- Paint. When choosing a paint, it is necessary to take into account the wood species, operating conditions, compatibility with coatings (linseed oil, varnish).
- Screwdriver. But better screwdriver.
- Chipboard or wood sheet. The thickness must be at least 40 millimeters, otherwise the shelf may not sustain the equipment.
- Leg mounting. Do not save on this, it is better to buy metal fasteners, rather than plastic, which are fragile and can break from the slightest mechanical impact.
- Wood drill. The size corresponds to the diameter of the screws.
You can use not only chipboard, but also an array of wood, in addition, it will be cheaper. It is necessary to make preliminary measurements in order to know how much to buy material for tables.
The material for the nights can be purchased either with a long pipe, and independently cut to size, or buy a kit. It is more expedient to buy a kit, because it costs less time and effort, and it may be cheaper.

Paint selection is an individual solution. It is best to choose a paint that will be in harmony with the columns. Also, it is important to consider the characteristics of wood. Approximate cost is 200 rubles. If you additionally buy varnish, then another 150 rubles.
Rack mounts can be found at the hardware store. Approximate cost - 300 rubles.
Screws and drill. Approximate cost is 100 rubles. Screws must be selected to match the color of the racks, unless they are painted.
Reference! The total value of all purchases does not exceed 1,800 rubles. But it is possible that it will be cheaper, because some materials are available at home.

Racks for speakers yourself: step by step instructions
To make the racks with your own hands, you need to do the following:
- If you took a pipe that we sawed it by measurements (4 racks), and if you took a kit, then you need to pull out the plastic plugs. Because the mount is designed so that the tube sits on it, and the screw is screwed to unzip the plastics and fix the tube.
- The sheet of wood is sawn into 4 parts. Platforms must be made in pairs the same size. Some more than others, those that will be installed more on the floor, so in order to give greater stability, they must be larger in area. The dimensions of the upper shelves where the columns will be located should correspond to the widest and longest part. Thus, everything will look harmonious.
- Attached fasteners, and put labels where it is necessary to make holes for screws. This should be done with precision.
- On the marks made holes.
- Then wooden blanks are painted. And after drying the varnish is applied. Paint apply 2-4 layers. It is better not to rush and allow each layer to dry to the end. To speed up the drying process, you can use a hairdryer.
- After drying, plastic plugs are placed in the holes, into which screws will be twisted.
- On the dried shelves fastened mount for racks.
- Racks are made, and if everything suits, then the tubes are fixed. It is very important that the top shelf is even with respect to the floor, otherwise the speakers will roll down and fall to the floor due to vibrations. Thus, they can distort the sound or even break.
- On the canvas, which will stand on the floor, pasted felt lining. They are used so that the sound does not vibrate to the floor. Also, it greatly increases stability, and reduces the chance of column tipping.


Important! Speakers should be at ear level or slightly higher. Thus, the sound is better.
If the equipment is too powerful, then you need to take care of sound insulation, so as not to provide inconvenience to neighbors. As a rule, insulation is placed a few centimeters from the opposite wall from the speakers.
The disadvantages of the manufacture of stands and podiums can be attributed to the fact that the equipment cannot produce low frequencies at altitude.
Summing up the above, we can conclude that there is nothing difficult to do the columns for the speakers themselves. At the same time spend a small amount of money. Thanks to the racks, the speakers can be placed anywhere in the room, considering all the acoustic features of the room.
Leave Your Comment