Ceramic tile is a very popular material for decoration. Most often it is used in rooms where there is a rather high humidity. It is undemanding to care for, and with the right choice of pattern and color will become the decoration of any room.It is not necessary to hire a specialist for styling. If all the requirements are met, this can be done independently.

Necessary materials
Before you start laying the product, you need to prepare all the required tools. To do this, you will need:
- Roulette.
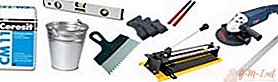 Level.
- A cutting tool, such as a grinder.
- Spatula with teeth.
- A roller or brush of sufficient width.
- Rotary hammer or drill with a nozzle in the form of a mixer.
- Rubber mallet.
- Tile.
- Glue.
- Composition for grouting.
- Primer.
- Separators.
- Water.
 Level.
REFERENCE. When buying ceramic tiles, you need to make sure that there are no cracks, chips, or other defects!
How to lay ceramic tiles on the floor
In order for the result of the work to be of high quality, the first step is to carefully prepare the foundation.

Foundation preparation
It must be absolutely even. If the base has slight defects, then they can be eliminated in the following way:
- Cracks and crevices should be covered with tile glue. Particular attention should be paid to the corners of the room. This will ensure the required waterproofing.
- Remove all dust and dirt.
If the base has quite significant defects, then more drastic measures are required:
- For a concrete floor, you need to make a screed.
- On wooden, it is necessary to lay sheets of plywood or OSB.
After leveling the surface, it must be waterproofed. A primer must be applied to the floor. It is applied to the base itself and to the bottom of the adjacent walls.
After the surface is leveled and waterproofed, you can proceed to the choice of layout. This must be done before marking.
Layout Options
The layout will depend on the selected layout option. There are several types:
 Traditional. It is the simplest and most common styling option. An interesting design decision is to use the product in several colors. The shape of the tile may be rectangular or square.
- Diagonal. Pretty original way, but pretty time consuming. For this option, only the square version of the product is used. The diagonal layout allows you to mask existing defects. However, it has one significant drawback - there are many pieces of different sizes and shapes.
- In a run. Visually looks like brickwork. A very original way, but not suitable for rooms of a small area.
- Deck. For this type, rectangular products are used.
- Christmas tree. According to the drawing it looks like a parquet board. A rectangular tile is used, which must be laid at an angle of 45 degrees.
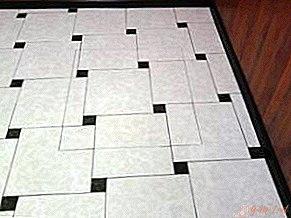
- There are more decorative types: modular, with contrasting inserts and combined. It uses tiles of different colors and sizes.
 Traditional. It is the simplest and most common styling option. An interesting design decision is to use the product in several colors. The shape of the tile may be rectangular or square.
Markup
The tile will be an excellent decoration of the room, but for this it needs to be laid correctly. Therefore, careful markup is required. There are many ways to apply markup. However, the application rules are the same for everyone:
- The whole element should be in sight and at the thresholds.
- You need to start marking from the geometric center of the room.
- When the application process is completed, it is advisable to lay the tile on the surface in order to visually evaluate the result.
Tiling
After the marking is applied, you can begin the installation procedure.
- First you need to dilute the glue, according to the instructions indicated on the package.
- The finished solution is applied to the tile, after which it is laid on the marked place.
- To lay down tightly, you must use a rubber mallet.
- Each laid product must be checked with a level so that the surface is even.
- To ensure that the elements have the same distance, crosses must be used.
- If the product needs to be given the right size, then it is worth using a tile cutter or grinder.
- After all the elements are laid and the glue is completely dry, it is necessary to wipe all the seams, after removing all the crosses.
- Grout is diluted as indicated on the packaging and is applied to all seams with a spatula. Surplus must be removed.
TIP. To grout dry faster, every 3-4 hours, the seams must be moistened with water.
After the whole procedure is completed, you can start cleaning the room.
IMPORTANT. Walking on the surface is not advisable for the first seven days!
If you comply with all the requirements and choose high-quality materials, you can quickly lay the tiles yourself.

Leave Your Comment