Of course, each owner of his apartment wants the interior to always be warm, cozy and comfortable. Therefore, various types of insulation directly under the floor cover are in considerable demand. In this article, we will analyze which ones are most profitable to purchase and which ones should be discarded. In addition, we consider the entire process of laying a laminate.

Is every laminate suitable for underfloor heating?
Of course, this will depend on some factors. There will always be an object that will be relatively more suitable for a particular case. Thus, it is best to pay attention to the marking. That it allows you to determine the quality offered by the manufacturer.
Accordingly, not every laminate is compatible with floors whose temperature is a plus sign. With the mark located in the instructions, the interval of the recommended degree should be located.
What kind of warm floor will fit the laminate
Thanks to modern production, today you can see that almost every laminate is able to come to the surface. However, there are exceptions everywhere: there is such material, which is of average quality and its thickness is about 6 millimeters. Thus, we will analyze the rest individually below in the article.

Underfloor heating
First, you should clarify the principle of operation and the specifics of manufacturing. The device consists of pipelines that are laid in a screed. They themselves are located parallel to each other directly under the floor. They are also connected to the heating system. High temperature water passes through it. Moreover, this shell has a fairly thin texture, which increases the risk of danger. Consequently, there are some restrictions on operation both in private and in multi-storey buildings. As for the coolant, it performs the function of heating the air.
Warm floor with heating cable
 If compared with the previous option, then this one uses the most simple installation. This is explained by the fact that such a design is made in the form of a cable. It is heated by the passage of electric current through it. Actually, the measurements in which electricity appears are indicated in kilowatts. Due to this, users should first think before purchasing: is it worth it to activate the equipment again or is it best to save money in this case. Installation, in turn, is carried out during the repair process in a few hours, and capital. Do this in a fairly thick layer of screed. Then it can immediately be used for its intended purpose. Naturally, the floor level rises a few millimeters. This usually ranges from three to four units. In addition, the power can be adjusted by changing the pitch.
Laminate Infrared Film Heaters
Speaking about the appearance, it is worth noting that it is provided in the form of a really thin film. It contains within itself certain metals, which, therefore, have the ability to emit infrared waves at a time when an electric current passes through them. Installation in terms of simplicity is similar to the previous instance. It is only necessary to lay on the floor.
Electricity consumption will be minimal, especially compared to electrical equipment. Currently, such a high demand for such an acquisition can be explained by the possibility of regulating the temperature using a wi-fi network. It really delivers meaningful convenience. In addition, such remote control via the Internet adds to the popularity of the device.
REFERENCE. There is even a special application for monitoring both on android and on iOS. The thermal film itself has marks to indicate the location of the future section. This facilitates mounting in different parts of the surface with any configuration. In conclusion, it is worth clarifying that installation can be done at any time.
Do-it-yourself floor heating under the laminate
Of course, this is not an easy matter. That is why below will be touched not only the most important aspects, but even seemingly insignificant points, which are also important in the process itself. Moreover, based on the above information, we can conclude that the installation of a film coating is the most profitable and appropriate. This is not only because of the ease of installation, but also on the basis of the main advantage - saving electrical energy and due to the convenience in temperature regulation. Therefore, further we will consider only the presented laying option.

Necessary materials
At the time of screed, you will directly need certain items. All of them are recorded in the list below:
- Rolls of infrared film. The main thing is that they are not with foil aluminum, since they are not at all suitable for operation.
- Laminate with a special backing.
- Adhesive tape to fix the material.
- Thermostat, with a sensor.
- Polyethylene film.
- Thermal insulation. Better if it is metallized.
How to make a warm floor under a laminate - an algorithm
So, when all the tools, as well as the products are ready, you can begin the main process - installation. Below is a list of tasks in the desired sequence that must be completed to achieve a result.
- The first thing to start with is preparation. First, eliminate possible obstacles, namely, remove unnecessary items from the workplace.
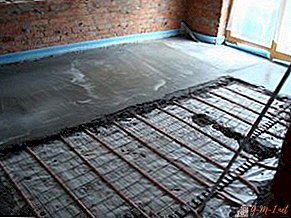 Then you can do the leveling of the surface. The way in which you will do this depends directly on the current state of the concrete space itself. When identifying small irregularities, you can use the bulk method, when, accordingly, a condition is created for pouring the mass into the holes. In addition, with uneven plates, screed is possible. As for the general meaning of this procedure, it is a need for a guarantee that various elements inherent in a warm floor will not be damaged by defects in the main coating. Otherwise, it will be so that the material lies unevenly.
- Next, you need to arm yourself with tape and lay the back to back. At the end, fix them with the product. As a result, you should get a floor where everything is covered, so to speak, with a sheet of thermal insulation.
- After completing the “preparation” stage, you can smoothly proceed to the screed. Laying is carried out on the prepared space. Consequently, heat-reflecting material must be laid in separate pieces.
- Installation itself is carried out in rows, and its connection is parallel. Contacts are attached next to copper strips, and are fixed by insulation, and bituminous.
- Then, sensors are installed with which you can adjust the temperature. Their connection is carried out directly into the layer.
- Next, connect the wires to the regulator. How exactly this is done should be indicated in the instructions that came with the purchase of the device.
- The very last step is testing. This stage is important throughout the procedure. Thanks to him, various shortcomings are identified, which will need to be addressed immediately.
 Then you can do the leveling of the surface. The way in which you will do this depends directly on the current state of the concrete space itself. When identifying small irregularities, you can use the bulk method, when, accordingly, a condition is created for pouring the mass into the holes. In addition, with uneven plates, screed is possible. As for the general meaning of this procedure, it is a need for a guarantee that various elements inherent in a warm floor will not be damaged by defects in the main coating. Otherwise, it will be so that the material lies unevenly.
As you can see, the whole process of how to put a water floor is simple, so everyone can handle it.

Leave Your Comment