 When working on a sewing machine, a lot of difficulties can arise and if an experienced master is able to quickly deal with them, then a beginner can have serious problems. An experienced craftsman knows that the incorrect arrangement of the thread can cause the stitch to be uneven and sloppy, and in the end the fabric may deteriorate, which will lead to material costs. It is for this reason that it is worthwhile to approach the study of the basics of working with this technique with responsibility in order to try to exclude the possibility of malfunctions as much as possible, and if they arise, be able to quickly fix them. The dressing algorithm depends on the brand of your sewing machine. To become a master in this matter, you must first study the instructions included in the kit. If you don’t have one, we’ll try to figure out how it can be done quickly and without errors.
Features of the refueling algorithm
Singer sewing technique is known for its features and quality. This is a great choice for beginners who want to learn how to create real masterpieces with their own hands in the future. The technique has parameters that make it very convenient. Learning to sew on the technique from this manufacturer is a pleasure. One of the main advantages of working on a machine is the ability to automatically work the main work item. To place the thread element in the technique, you must follow a certain pattern.
You should work with Singer as follows:
- Install the coil in its place - at the top of the housing. The manufacturer has provided a protective element, which eliminates the likelihood of the coil jumping off.
- Pull the thread element to the thread receiver, then move to the bobbin.
- Pass through the hole on the reel. The coil is located on the right side of the equipment body.
- Bring the machine into working condition, wind the required volume of thread onto the reel. Now you can remove the reel that is ready for further use.
 Using this scheme, you can perform winding on a bobbin. To put the thread directly into the eye of the needle, it should be lifted, this can be done by scrolling the wheel, which is designed to control. Twist it towards you.
Place the coil in the appropriate holder, it is located on top, fix it with the cap. Using a thread guide, pull it, the next step in the fixation will be the spring, which is designed to be tensioned.
After that, follow to the compartment, which is located above the needle, go through the special lever. Next, move back and down, here do not forget about the tensioner, this is a compact clip, which is located above the needle. The final step will be a needle-feed. Head from front to back.
IMPORTANT. All actions must be performed only when the equipment is disconnected from the network, otherwise the likelihood of injury is too high.
Threading errors
In the process of performing this operation, it is quite realistic to make mistakes that will affect the quality of your work. To eliminate the likelihood of obtaining a poor-quality result, we consider what errors can be in order to provide for them.
In the event that the line winds or rings form - you did something wrong. This may be the cause of insufficient tension of one of the threads. Some needlewomen mistakenly believe that it is enough to verify the correct installation of only the lower thread. This opinion is incorrect, only with a clear implementation of each of the preparation operations, the equipment will work correctly.
REFERENCE. The quality of the stitch largely depends on the correct installation of the upper thread.
For work, choose threads of good quality. To ensure that the line is even, you should see if the thread guide is functioning correctly. If it doesn’t pull, fix the flaw.
The most common mistakes:
 The spring, which is responsible for the tension of the thread, does not press well. Therefore, it is poorly pressed. Defining this error is extremely simple. The foot is moved to the lower position, the thread is threaded into the eye of the needle and stretched up. Further, the foot rises again, the thread element lowers and stretches. You will need to perform this operation several times at once, control the degree of tension. If there are no problems with pulling it, we can conclude that the spring does not function correctly.
- Excessive tension. It happens that the thread is stretched exactly like a string. This is clearly shown when stitching along the lower thread element. The line will be sloppy and does not run smoothly enough. In this situation, it is necessary to adjust the lower thread element and, of course, its tension.
- The lower thread element is thicker than the upper. If you still do not know, it is the upper thread element, so to speak, that sets the rhythm throughout the line and it defines the bottom line. To make the seam neat, the lower thread should be selected carefully, it should be sufficiently extensible. This determines the reliability of your sewing equipment, as well as the quality of tailoring.
 The spring, which is responsible for the tension of the thread, does not press well. Therefore, it is poorly pressed. Defining this error is extremely simple. The foot is moved to the lower position, the thread is threaded into the eye of the needle and stretched up. Further, the foot rises again, the thread element lowers and stretches. You will need to perform this operation several times at once, control the degree of tension. If there are no problems with pulling it, we can conclude that the spring does not function correctly.
Where to put the upper thread
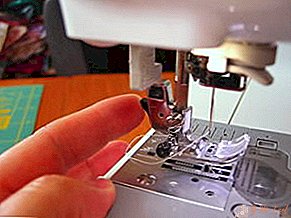
For refueling, you will need to raise the foot to press the fabric, then you need to slightly move the wheel and move the needle to its highest position. You can work on technology no earlier than the upper thread will be tucked.
The fueling algorithm is as follows:
- Place the bobbin on the rod, you can see it from above.
- Grasp the edge of the thread and pull.
- Insert the edge into the upper eye for threading. Thanks to this step, the thread will be regulated during operation.
- Put the thread from the bottom into the eyelet located on the thread guide, and then go to the needle.
If you do not perform at least one of the steps, be prepared for the fact that you have to refill the thread. Please note that for proper functioning, a certain angle of thread must be observed.
What to do if you have a technique of a new sample?
Many needlewomen in the house have old-style sewing machines. Some people inherit this technique from mothers or grandmothers, but not everyone knows how to work with it, and the instructions for use have long been lost. They completely cope with the tasks assigned to them and it remains to figure out how to thread the thread in a manual sewing machine.

The technique of an older type has a similar pattern of broaching a thread. The difference is how the thread is mounted on a typewriter.
IMPORTANT. The thread in the needle is threaded into the groove, it is located along the needle. You can identify it by swiping the needle.
It is necessary to refuel the equipment according to the scheme that is given on the cover. There is a scheme for rotary machines, because these are old-style units.
The fueling algorithm for the old car is as follows:
- Lock the coil.
- Carefully thread the thread element into the tensioner, which is located on top.
- Bring it through the spring. She looks like a hook.
- Pass the thread into the thread guide, it also has a hook for this.
- Now it remains to go to the needle clamp.
A fork is used in this type of technique, it allows you to throw a thread at yourself.
What to do with a bobbin?
REFERENCE. First of all, it is worth noting that the thickness of the thread that is installed in the bobbin should be one size thinner.
Before refueling the bobbin, check that it fits under the bobbin case. To do this, place it in the cap, while not forgetting the need to observe the direction of the wound thread. Its tip should be threaded into the tension regulator. Pay attention to how the bobbin is spinning, it should not move jerkily. The movement should be smooth.
REFERENCE. The bobbin case is one of the most important parts of the sewing machine, it must always be maintained in perfect condition. There should not be any chips or damage on its surface.

Leave Your Comment