Of course, building any invention on your own is a reason for pride. Moreover, this saves money and gives pleasure. However, it should be understood that it is necessary to take into account some nuances, features. And so that the work process is as productive as possible, this article has been written, which will tell you about what you should know and what points should be paid attention to.
![]()
Bench transformer
It is preferable to imagine how the construction is characterized and what classifications it is divided into.Do-it-yourself transformer bench - drawings, dimensions are important criteria for achieving a positive and expected result.
Varieties
Each future user selects for himself the most suitable model in his opinion. Some people prefer it to accommodate three people, for someone it is important to have a countertop. Therefore, the following types exist:
 Classical. You may notice that from the outside such a device looks modest. There are no unnecessary details and various elements. But in functionality, it can please everyone. The capacity of this building is quite large. In addition, in the absence of guests, it is possible to fold the unit into two seats. Also, do not forget about the presence of a small table on which a laptop or other similar items can safely fit in without problems.
- Folding option (bench flower). Despite the fact that the presented device is most similar to the previous one, this one has its own unique features. By the name you can guess that the design is similar to a blossoming flower. The main advantage is the ability to move the component backs as you wish. In addition, the unit in a coordinated form is easy enough to carry.
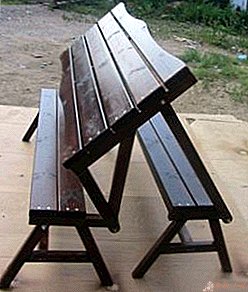
Table bench transformer
As for this variety, it is the mass of its inherent advantages. So, in a matter of seconds, you can expand the entire structure, and without putting a lot of effort into it. Moreover, the device is able to turn from one bench to another - with a table and two seats that can accommodate up to 6 people. In modern times, such a model is considered the most common, has a fairly high demand among consumers.
![]()
DIY transformer bench
To complete the entire process as accurately as possible, it is recommended that you follow the following algorithm in the sequence presented.
Drawings and Dimensions
First you need to carefully prepare. This step includes both the selection of the desired scale of the structure, and the further creation of a sketch that makes it easier to orientate in the work. Thus, the tested circuit with approximate parameters is shown below. Of course, the most difficult action in this matter will be the construction of the mechanism itself. It is due to him that the device will be transformed.
![]()
Choose materials
To avoid miscalculations, you should initially prepare all the necessary details. These primarily include:
- Electric drill.
- Standard screwdriver (if not, you can use a screwdriver).
- Construction coal.
- Bulgarian.
- Saw of any type.
- Special varnish.
- Sander.
- Products for fastening (screws, screws, bolts and nuts).
As for the material itself, so it can be any sample of boards and beams. The main thing is that they are planed. Everything should be preferred pine, larch or birch.
REFERENCE! If you want to make the most durable product, then there is also the opportunity to use oak.
Here are the quantities and parameters the parts will need:
- Two bars with indicators of 90 by 45 by 1445 millimeters.
- Five bars 90 by 32 by 1480 mm.
Step-by-step instruction
Now that all the necessary tools and parts are ready, you can proceed to the main stage of the whole process - the manufacture itself.
- First you need to collect the legs for the structure. To do this, you need to cut out 8 identical products from the bars, the length of which should be 70 centimeters. For balance, you can create small sections from all sides.
 Then it is worth starting the construction of the frame. It is necessary to cut 4 parts of 170 cm and 40. Next, they need to be docked and fixed with screws. Pre-drilled holes in them.
- Next, you need to take the bar and nail it, thereby dividing the structure into sections of 500 mm.
- Then you can connect the legs with the seat at a distance of 10 mm from all possible angles. At this stage, it is advisable to tighten all parts firmly to 3 bolts.
- After all, you should arm yourself with a 70 to 170 bar and attach it with additional parts.
- All the resulting products can be combined into a single system. This is recommended using bolts.
- Two materials, the length of which is 40 centimeters, need to be fastened between the bench and the shield. And other logs (110 cm each) should be attached with self-tapping screws so that an inclined back is formed.
- In conclusion, it is advised to check the resulting structure for strength. If the result is satisfactory, you can start processing the product. That is, you should take the machine for grinding and perform the technical phase.
Finish
To ensure the construction longevity in operation, it is necessary to engage in high-quality processing of the device. To do this, cover the material with a stain or a special varnish.
IMPORTANT! The product dries within 36 hours, therefore, it is impossible to use the invention immediately after painting.
In case you are going to install a bench in the fresh air, you can equip the material with waterproof paint. This is necessary so that the tree does not begin to quickly rot and mold. In addition, with periodic courtship, you can guarantee a long service life of the structure.
![]()
Leave Your Comment