 A cooker hood has become an indispensable tool in the kitchen. This is not surprising, because in the process of cooking in the air a large amount of combustion products and particles of fat accumulate, which settle, polluting the furniture. One of the most popular models on the market is considered to be an inclined hood, combining stylish concise design and high performance. Let's talk about the features of its installation.
Features of installing an inclined hood in the kitchen
The method of installing an inclined hood depends on the principle of its operation. Distinguishable by-pass models - they do not purify the air, but take it to the ventilation shaft, recirculation - purify the air using carbon and grease filters, and combined - having maximum performance due to the combination of exhaust and air filtration.
ATTENTION! When installing diversion and combined devices, it is worthwhile to provide for the presence of a ventilation hole and consider the layout of the air duct to it.
Materials and Tools
If you have decided on the model, proceed to installation. In addition to the device itself, we need:
- roulette;
- level;
- hammer drill;
- screwdriver;
- pencil.

To install the outlet equipment, you will additionally need a ventilation grill with an opening for the air duct, a corrugated pipe and connecting clamps.
ATTENTION! The diameter of the hole in the ventilation grill and the diameter of the corrugated pipe must be the same.
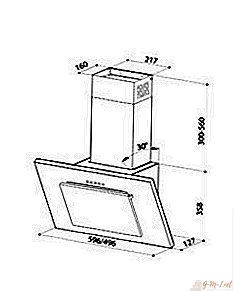
Determining the mounting height of the inclined hood
The installation height of the device for each model is individual, it is indicated in the instruction manual. Despite the fact that modern technology is equipped with heat-resistant glass, there are standard recommendations for determining the height, which depend on the type of hob.
When mounting above gas stoves, the lower level should be at least 55 cm, above electric ones - at least 35 cm.
Hood mount
 First of all, it is necessary to outline the mounting holes on the wall, having previously taken the dimensions from the outside of the device. Horizontal lines on the wall are marked using the building level strictly horizontally. Check if a hidden cable passes through the hole. To do this, you can use the hidden wiring warning device.
Then, using a puncher, drill holes in the wall, in the designated places. If the wall is tiled, then first drill a tile with a drill for ceramics in shock-free mode, and only then drill concrete. Insert the dowels into the holes obtained and screw in the screws without screwing about 6-7 mm to the end.
Hang the device on the screws, open the glass door, remove the grease filter and screw the screws to the end. Insert the filter back.
Power connection
We connect to the power supply by connecting the plug to the outlet. It is advisable that the outlet be held in advance at the level of the device or hidden behind its body. The average power of a household hood is approximately 160 watts. For its connection, a wire with a cross section of 1.5 mm will be sufficient2.
Corrugated Pipe Mount
The first step is to install a ventilation grill with a hole. We insert the corrugated pipe into the grill hole, fix it with clamps and coat the joints with sealant. The second end of the pipe is connected to the hood, the seams are treated with sealant. The pipe must be installed as evenly as possible, avoiding steep corners.
ATTENTION! The more corners and turns in the duct, the lower the output will be. One turn reduces productivity by about 10%.
The air duct from the corrugated pipe does not look very aesthetically pleasing and can ruin the interior of the kitchen. In order to hide it, they mount a decorative box of drywall, which is painted in the color of the walls or furniture, or glued to both.
Before mounting the box, you should check the operation of the hood, “drive” it in all modes. If everything works properly, you can proceed to the decorative box.
Design Benefits
In addition to the stylish and ergonomic design, the inclined hood has a number of advantages. Such as:
- low noise level due to the use of advanced engines;
- high productivity, which is achieved, including due to the inclined work surface, trapping the flow of air rising from the hob during its natural movement;
- touch display, ease of cleaning compared to push-button;
- automatic switching on, off and selection of optimal power for maximum performance.

The design of the inclined hood allows it to be installed indoors without special skills. With the correct installation of the device, microparticles of fat, fumes and other unpleasant odors will be completely absorbed by the equipment, and a highlight will appear in the interior of the kitchen.
Leave Your Comment